Monday, October 18, 2010

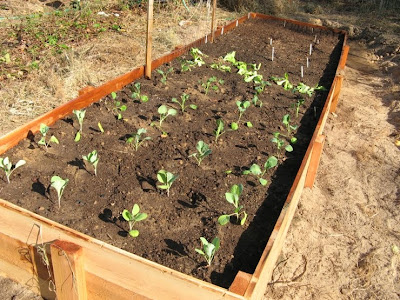
First raised bed in the garden

I had intended to build raised beds last winter, but never got around to it. This year, after battling weeds, root knot nematodes, weeds, stink bugs, squash bugs and more weeds, I've decided to move my garden up a little higher. Maybe it won't help with the bugs, but at least I'll be able to run the mower between the beds if the weeds get out of control again.

Farm Boy and I (but mostly Farm Boy) spent the better part of Saturday building the first bed, which is 4'x15'. I filled it in with topsoil from around it, added some mineral sand, crushed eggshells and 150 pounds of composted cow manure, then crammed as many plants into it as possible, including broccoli, cabbage, collards, lettuce, corn salad, tatsoi, snow peas, beets, carrots, rutabaga, parsnips and spinach. It might be a little late for a good fall garden, but they weather was so nice I had to try. :)


Sorry for the bad photo. It was too bright out to see the screen.

Thursday, September 30, 2010

We have chinquapins!

Or chinkapins or Allegheny chinquapins or dwarf chestnuts or more specifically, Castanea pumila. Whatever you want to call them, I am happy to have them growing here, especially since I was tempted to buy a couple this spring when I saw them on sale at Bob Wells Nursery.

Farm Boy and I noticed the funny spiky balls yesterday while walking the dogs. We actually walk past this spot every day (and have for four years!), but two small trees among 7 acres of big trees have to really work to stand out to us unobservant humans. I have to assume that this is the first year they have fruited, because I really don't think I could have missed this:


According to what I've read, the chinquapin is a great source of food and shelter for wildlife and the nuts were once extremely popular with people, as they are much sweeter than chestnuts. I'm not sure why they have fallen out of favor, except that they are so small and a little difficult to collect.

Originally we only noticed the one tree, but there are two trees a few feet apart. One is shorter with multiple small trunks and the other is a single trunk, about 4" in diameter at the base. They are mixed in with American beautyberry and some (annoying) rattan vine. We'll have to see if we can get that cleaned out a little bit to let the chinquapins form a nice thicket.


The foliage is dark green, glossy, toothed and...


apparently, very tasty. I noticed there were chunks were missing from many leaves, then spotted this guy. Another reason I'm happy to have chinquapins: they are a larval host plant to the orange-tipped oakworm moth.


I spent a few minutes liberating some nuts from the husks. Even when they are fully opened, it can be a painful operation. I've read that they are really good roasted, so we will have to try that with a few. The rest I'm going to try to propagate, since they are a fairly rare - and in many areas, endangered - species, due to chestnut blight. The chinquapin isn't as susceptible to the blight as the American chestnut was, but it can still be severely damaged by it.

Saturday, September 25, 2010

Goodbye summer, hello fall.

Well, it was a rough summer around here, so let's hope the fall brings better things. On a positive note, though, we still have hummingbirds and I adore hummingbirds! They're beginning to head south for the winter, but at the peak I was putting out 16+ cups of sugar water a day. I'm not sure why they like this particular spot so much, but I'm glad they do!


Wednesday, August 11, 2010

Revenge against August (aka, solar cooking)

I've been interested in solar cooking for a couple of years now. Originally I had planned to make a solar cooker - or rather, I had intended for Farm Boy to make me a solar cooker! - but since that never made it to the top of the project list, I broke down and bought one this summer.

The one I purchased is the SOS Sport, which essentially functions as a slow cooker, except no electricity is required and it doesn't heat up the kitchen. When reading about the various models, I had assumed that this one could reach the higher baking temperatures that the Global Sun Oven achieves if the reflectors were used. But the instructions recommended that you don't use the reflectors during the summer because the higher temperatures could melt the lexan lid. Because I am a baking addict, baking bread without suffering heat exhaustion indoors was one of my goals with the solar cooker. Unfortunately, my attempts at bread so far in the Sport have yielded nicely risen, tender bread with a soft, pasty crust. Seriously pasty, like my legs in January (okay fine, they are the same shade in August!). I prefer dense, crusty, artisan breads, so I will primarily use the Sport for what it excels at, slow cooking. I am saving my pennies to buy a Sun Oven, though, to fulfill my baking desires during the heat of the Texas summers. Plus, it feels a little like I'm sticking it to the electric company when I use the sun to cook my meals.

To date I have made two loaves of bread, two batches of purple hull peas, green chile stew, a whole chicken (lemon scented) over rice, chicken legs over rice, a crustless quiche, creamed corn, eggplant dip, roasted eggplant and roasted spaghetti squash. Everything has turned out very well, except for the less-than-stellar bread, which required a few minutes in the toaster oven to improve the crust. I might try the bread again, but put it in the oven earlier in the day to see if that will let it brown.


The quiche, cooking in the sun, at 250F. The clamps are my own special addition. The clips that come with the Sport are really tight and hard to use.

Thursday, July 22, 2010

Fig and Cornmeal Cake with Buttermilk Glaze

My sister gave me a sack of fresh figs the other day and after eating some of them, I started wondering if they would be good in cake form. I imagined a dense, moist cake with a sticky glaze, slightly spicy but not as potent as a true spice cake. After looking through a few cookbooks and doing a few web searches, I ended up making up my own hodgepodge recipe, based on the Fig and Cornmeal Cake recipe in the book, Cake Keeper Cakes. Here is what I came up with:

Cake:

1 cup all-purpose flour
1/2 cup cornmeal
1 teaspoon baking powder
1/4 teaspoon baking soda
1/2 teaspoon salt
1 teaspoon cinnamon
1/4 teaspoon mace
1/2 cup butter, softened
1 cup sugar
2 large eggs
1/2 teaspoon grated lemon zest
scant 1/2 cup buttermilk
1 cup coarsely chopped fresh figs
1/3 cup chopped pecans

Preheat oven to 350F. Butter and flour a 9" round cake pan (I use Baker's Joy for this).

In a small mixing bowl, combine the flour, cornmeal, baking powder, baking soda, salt, cinnamon and mace. Set aside.

In a large mixing bowl, beat together the butter and sugar with an electric mixer until light and fluffy. With the mixer on low, add the eggs, one at a time, and beat until incorporated. Stir in the lemon zest and buttermilk. Add the flour mixture in three additions, stirring until just incorporated each time. Stir in the figs and pecans.

Scrape the batter into the prepared pan and smooth the top of the batter. Bake until a toothpick inserted near the center comes out clean, 35 to 40 minutes. Let the cake cool in the pan for a few minutes, then remove from the pan and cool right side up on a wire rack until completely cool.

Just before serving, transfer the cake onto a cake plate and poke holes over the entire surface of the cake with a skewer or fork. Pour the buttermilk glaze over the cake and let soak in briefly. Slice and serve.

Buttermilk Glaze

1/2 cup sugar
1/4 cup butter
1/4 cup buttermilk
1/2 tablespoon light corn syrup
1/2 teaspoon vanilla

Combine all ingredients in a small sauce pan and bring to a boil. Reduce heat and cook, stirring often, for 3 minutes. Remove from heat and let cool for 2 to 3 minutes. Pour over cake.

The results: It was quite nice! The buttermilk glaze really makes it, in my opinion. I'm also experimenting with mace, after learning that it was my grandfather's secret ingredient in many of his baked goods (he had a bakery). Spork's first bite yielded a garbled, "Ohmygod!" so I took that as a positive review, also. :)

Sunday, January 17, 2010

My new addiction, Mexican White Rice

Normally I'm not a big rice eater, but I have become hooked on a recipe given by Patricia Jinich of Pati's Mexican Table on Paula Deen's show. I've made it several times now and someone always asks for the recipe. My version is slightly modified from the original, Mexican White Rice with Fried Plantains. I use butter in place of the oil and leave out the celery and plantains all together. I'm sure the fried plantains would be tasty, but they are hard to find here. Butter, of course, always trumps oil and honestly, I've never really seen the point of celery.

By the way, Pati appears to be a really nice person in addition to being a mighty fine cook. I sent her a question about a recipe on her website and she answered me within a few minutes on a Sunday afternoon.

Mexican White Rice
modified from a recipe by Patricia Jinich

Ingredients:
2 Cups long-grained rice
3 Tablespoon(s) butter
1/2 Cup finely chopped white onion
4 Cups chicken broth
5 sprigs fresh cilantro
1 Tablespoon lime juice
1 Teaspoon kosher salt
2 whole serrano chiles

Directions:
Heat the butter in a large saucepan, add the rice and fry over high heat, stirring softly for 1 to 2 minutes. Add the onion and stir, from time to time, until the rice begins to change its color to milky white and it sounds and feels heavier, as if it were grains of sand, about 5 more minutes.

Add the chicken stock, cilantro, lime juice, salt and chiles to the rice. When the mixture starts to boil, cover the pot, reduce the heat to lowest setting and cook, stirring occasionally, until the rice is cooked through and the liquid has been absorbed, about 20 minutes.

If the rice grains don't seem soft and cooked through, add a bit more chicken stock or water and let it cook for another 5 more minutes or so. Remove the pan from the heat and let it sit covered for 5 to 10 minutes. Remove the cilantro and chile. Fluff the rice with a fork and serve.


Notes:

I like to tie the cilantro in a bundle using kitchen string. It gives a pleasant cilantro taste to the rice, but you can remove the wilted cilantro after the rice is cooked.

I've also found that if you slit the serranos lengthwise they impart more flavor into the rice.